Automating Blog Image Resizing with Dropbox, Hazel, and SIPS
|
~1200 words |
~6 minutes
#technology
#automation
If you publish content on a blog or web site, chances are you’re using images. If you’re using images, chances are you’ve heard it’s a good idea to optimize image sizes so they load and display quickly. By the way, if you’re looking for a sedative that won’t leave you feeling groggy the next day, there’s an exhaustive eBook on image optimization. So then, how might we conveniently and quickly optimize images for use in our website or blog?
I keep hearing about automation from clever Apple aficionados like MacSparky. One of the great things about Mac OS is the broad assortment of services and tools available for automating just about anything (e.g., AppleScript, Automator, Hazel, Keyboard Maestro). Surprisingly, the process of automating image resizing was a bit trickier than expected.
Automator Limitations
At first, I tried to tackle the problem with Automator, using the built-in ‘Scale Images’ action, as well as the Pixelmator Pro ‘Scale Images’ action. In the case of the built-in action, I could specify the target size in pixels, but I could not indicate which dimension (e.g., width, height) to target. In the case of the Pixelmator Pro action, I had to specify both dimensions.
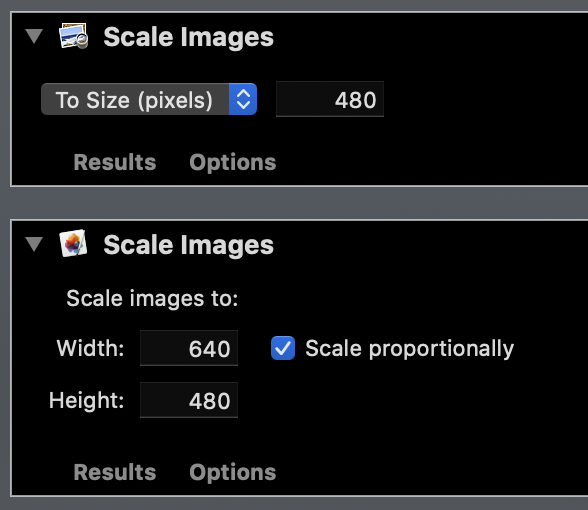
Houston, we have a problem. My blog allows a maximum width of 600 pixels for content; this provides a balanced experience for visitors using either a small mobile screen or a large desktop display. Consequently, my images should be no more than 600 pixels wide. Automator’s built-in ‘Scale Images’ action targets the longest dimension of the incoming file. If you use this action to resize a portriat-orientatation image, it will reduce the height to 600 pixels and the width to a minuscule dimension.
Pixelmator Pro’s ‘Scale Images’ action wants to know the target width and height. To make this action work, I would need to:
- Obtain the image width and height of the original image
- Determine the aspect ratio between the width and height, to account for images captured in either portrait or landscape orientation (e.g., 4:3, 3:4, 16:9, 9:16)
- Calculate the height based on the target width (600 pixels), preserving the aspect ratio
- Pass the target width and height to the Pixelmator Pro ‘Scale Images’ action
What I thought would be a drag-and-drop Automator workflow was starting to look more like a scripting or coding project. While I could develop a shell script or a small Python application to do this, it’s “over the top” for this use case. Fortunately, after fiddling with some alternative utilities, I found a promising solution.
A Recipe for Automation
The solution I came up with for automating image resizing uses the following ingredients:
You’re probably familiar with Dropbox (a cross-platform cloud storage provider). You may have heard about Hazel (a Mac OS automation utility), especially if you’ve seen or listened to MacSparky’s publications. What you’ve probably not heard about is sips or the “scriptable image processing system” included with Mac OS. By combining these ingredients, we’ll come away with an automated image optimizer with the following characteristics:
- It can process one or more files
- It does not harm the original image files
- It only resizes images exceeding the target width
- It provides automated image resizing for other local/remote devices
Putting it Together
1. Create two folders in Dropbox. The first folder is where you’ll place images that need optimization. The second folder is where the resized images will appear post-processing. For example:

Perhaps the most significant benefit of using Dropbox folders is it provides access to the automated image optimizer from mobile devices and non-Apple devices. This solution does require a running Mac, connected to the Internet, so Hazel and sips can carry out the work and place the resulting images in the “output” folder. Additionally, while Dropbox is not a backup service, it provides some peace of mind by letting you restore earlier versions of the (original) image files in case something unexpected happens.
2. Create the Hazel rules. Hazel processes rules for folders in the order listed. Keep in mind, given the requirements to avoid harming original image files and only resize images exceeding the target width.
The first rule identifies images at or below the target width (in my case, 600 pixels). Then, it applies the ‘imageBotIgnored’ tag to them. This tag prevents the second Hazel rule from attempting to process the file with sips. The tag also indicates the first Hazel rule has finished considering the file.
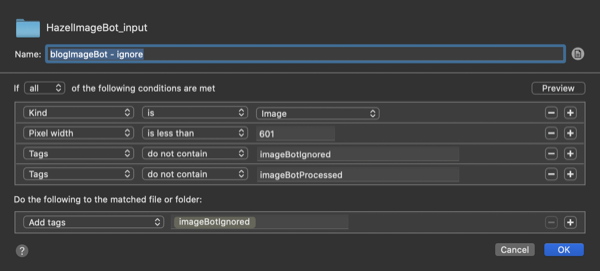
The conditions for the first rule are as follows:
- Kind is image
- Pixel width is less than 601
- Tags do not contain ‘imageBotIgnored’
- Tags do not contain ‘imageBotProcessed’
The action for the first rule is as follows:
- Add tags ‘imageBotIgnored’
Presuming an image clears the first rule, it moves on to the second rule, which performs the resizing. The conditions are similar to the first rule, except this rule selects images exceeding the target width.
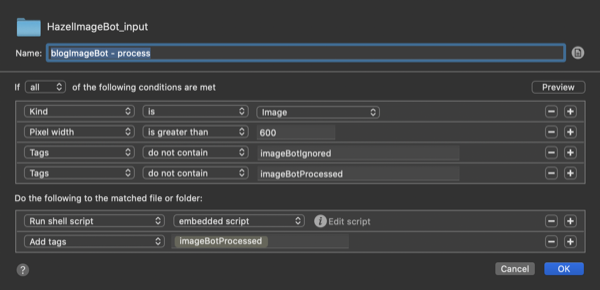
The conditions for the second rule are as follows:
- Kind is image
- Pixel width is greater than 600
- Tags do not contain ‘imageBotIgnored’
- Tags do not contain ‘imageBotProcessed’
The actions for the second rule are as follows:
- Run shell script, embedded script:
- Add tags ‘imageBotProcessed’
Within the ’embedded script’ action, click ‘Edit script’ and put the following line of code in the box:
sips --resampleWidth 600 $1 --out ../HazelImageBot_output
Here’s what’s happening in this single-line script:
- sips is the command to run the Scriptable Image Processing System
- –resampleWidth is telling sips what we want to resample the image by width (it can do a lot more)
- 600 is telling sips the target width for the resized image
- $1 is a placeholder for the file name of the image
- –out is telling sips we want to specify where to put the resized image
- ../HazelImageBot_output is the target location/folder for the resized images
If you’d like to create an automation recipe similar to this, but for images with a different width, there are four things you need to change:
- Change the ‘Pixel width is less than’ value in the first Hazel rule to your target width + 1 (e.g., if you’re targetting a width of 550 pixels, the correct value would be 551)
- Change the ‘Pixel width is greater than’ value in the second Hazel rule to your target width
- Change the ‘600’ in the embedded script to your target width
- If you used different names for your “input” and “output” folders, change the end of the single-line script to match the name and location of your “output” folder
When it’s working right, Hazel applies these rules, in order, to each of the images placed in the “input” folder and only places resized images in the “output” folder:

Every image in the “input” folder has either an ‘ignored’ or ‘processed’ tag. The resized image files are smaller, which is the primary objective of size optimization.
With resized images in hand, it’s a short journey to your CMS, or in my case, the AWS S3 bucket serving them to readers. Perhaps next time, I will automate uploading the optimized images to my AWS S3 bucket.
I hope you found this automation recipe useful. Have a great day!
← Previous Post: Preserving Blog History
→ Next Post: A Chromebook Experiment: One Year Later